The following are all blog posts from our 2017 CAPS. Feel Free to read and enjoy.
"Night Photography" by John Williams
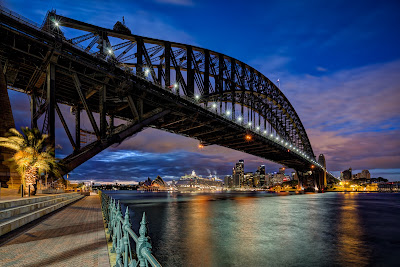
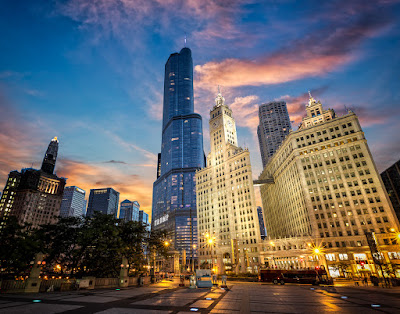
I find night photography to be a very fun way to discover whole new ways of looking at the world through our cameras and it presents photographers with such a great opportunity to capture fantastic images. Just as with all image making; composition, light, color, contrast, texture and dynamic range are all differentiators. This is indeed true during the day, but it can really make a huge difference at night. If you want to expand your image palette, there’s probably no better way to do it than with night and low light photography. No need to travel to distant exotic locations because when the lights are turned on, streets, buildings, bridges and attractions take on a whole new look, what often may be mundane during the day can become fantastic subjects at night.
There are many aspects to night and low light photography!
Getting the right exposure, color
balance, obtaining sharp focus, dealing with ultra-wide dynamic range and even
seeing your compositions. We’re going to take on this exciting photography
subject and dig into several of these challenges in our CAPS Night & Low
Light Photography session.
Let’s discuss one aspect of night photography that’s
a really interesting phenomenon which can occur when you have a point of
light. This is called Star Effects, or
Starbursts we can also include Sun Flares and Sun Stars. The more you know
about how these are created, the more you can incorporate them into your
photography by intention.
Starbursts are caused by diffraction in the camera
lens. The effect is magnified when you
have a point source of light in your image frame, like a spot light, street
light, sun, etc. When light waves pass
by an object, especially like the diaphragm in a lens, this causes the light
waves to alter their direction and spreads the wave pattern. This occurs not only with light, but also
with sound waves and water as well.
In photography, diffraction occurs differently
depending on the size of the aperture opening.
Normally more diffraction is thought to be a bad thing in photography
because it is associated with softening the focus of an image. But, it is because of this diffraction on
distant single-point light sources that we get a starburst effect, especially
noticeable in night photography.
 The design of your lens aperture diaphragm and the
aperture setting you select has a profound impact on the starburst effect. You should also know that differing lenses,
even within the same brand, let alone altering brands, will have vastly different
characteristics to the look of this effect.
If the aperture blades form a perfect circle, you will not get the
starburst effect. Instead, you will have
distant highlights producing Airy Discs on your image which may be so small,
you may not even see them.
Here are some tips to get you started with Starburst
effects in night photography:
Tip 1: Test and practice starburst effects at
home with your lenses. Use a flashlight
to create the distant point source of light.
Set up your camera on a tripod so you can alter your aperture and change
your shutter speed to accomplish the correct exposure. Take a series of pictures with each lens,
using f/8.0, 11, 16 and 22. You will
learn very quickly just how differently your lenses create the starburst effect
and just how different the effect looks.
Depending on the number of aperture blades, you will see various numbers
of points of light. The result of this process will help you to really know
your lenses for the ideal starburst effect.
 Tip 2: Use smaller apertures to create more
defined points of light. Usually that would mean a minimum of f/11 if not f/16
or f/22. It’s strange how this works,
but technically, if you have an even number of aperture blades, you will get
that many points of light. If you have
an odd number of aperture blades, you will get twice the number of points of
light. So, 6 Blades equals 6 spikes of
light, but 7 Blades will equal 14 spikes.
Tip 3: Beware of filters! Filters over the front of your lens can and
usually do cause flare from point light sources. They can also cause you to not achieve the
starburst effect you are looking for.
Try removing any UV or other glass in front of the front element of your
lens and you should achieve a much better result.
Tip 4: Get the right exposure. Exposure affects the intensity of the
starburst effect. The longer the
exposure, the more star effect you will see.
The brighter the highlights in a photo and depending on how much
contrast is in the scene will all influence how much you will see the starburst
effect.
Tip 5: Subject to lens distance will influence
how large the starburst effect appears. Often,
if the point source of light is up against an object partially blocking it,
like a building or bridge, or even the sun at the horizon, this will make the
starburst effect more pronounced. Of course, the relative size and brightness
of the point source as well as the quality of light overall will have an
effect. Nothing takes out a starburst
effect quicker than a bunch of haze, smoke or fog.
John
Williams is a passionate and accomplished photographer living in Lake County
and a longtime member of the Lake County Camera Club and CACCA community.
Modern digital photography presents the perfect intersection of technology and
art that John has found totally engaging with his technically inclined
interests. While John enjoys a wide
variety of photographic styles and subjects, his favorites include
Architectural, Landscapes, Cityscapes, Travel and Night photography.
Website: Photography by John Williams
John will be presenting "Night and Low Light Photography" at CAPS-Chicago Area Photography School on Sunday, November 19th.
To see the entire schedule of classes go to: caps.caccaweb.com or click here: Home
To register go to: Chicago Area Photographic School (CAPS) 2017 | Summary | powered by RegOnline
To see the entire schedule of classes go to: caps.caccaweb.com or click here: Home
To register go to: Chicago Area Photographic School (CAPS) 2017 | Summary | powered by RegOnline


