Monday, November 13, 2017

Posts from 2017 CAPS

The following are all blog posts from our 2017 CAPS.  Feel Free to read and enjoy.

"Night Photography" by John Williams

I find night photography to be a very fun way to discover whole new ways of looking at the world through our cameras and it presents photographers with such a great opportunity to capture fantastic images.  Just as with all image making; composition, light, color, contrast, texture and dynamic range are all differentiators.  This is indeed true during the day, but it can really make a huge difference at night. If you want to expand your image palette, there’s probably no better way to do it than with night and low light photography.  No need to travel to distant exotic locations because when the lights are turned on, streets, buildings, bridges and attractions take on a whole new look, what often may be mundane during the day can become fantastic subjects at night.

There are many aspects to night and low light photography!  Getting the right exposure, color balance, obtaining sharp focus, dealing with ultra-wide dynamic range and even seeing your compositions. We’re going to take on this exciting photography subject and dig into several of these challenges in our CAPS Night & Low Light Photography session.

Let’s discuss one aspect of night photography that’s a really interesting phenomenon which can occur when you have a point of light.  This is called Star Effects, or Starbursts we can also include Sun Flares and Sun Stars. The more you know about how these are created, the more you can incorporate them into your photography by intention.
Starbursts are caused by diffraction in the camera lens.  The effect is magnified when you have a point source of light in your image frame, like a spot light, street light, sun, etc.  When light waves pass by an object, especially like the diaphragm in a lens, this causes the light waves to alter their direction and spreads the wave pattern.  This occurs not only with light, but also with sound waves and water as well.

In photography, diffraction occurs differently depending on the size of the aperture opening.  Normally more diffraction is thought to be a bad thing in photography because it is associated with softening the focus of an image.  But, it is because of this diffraction on distant single-point light sources that we get a starburst effect, especially noticeable in night photography.
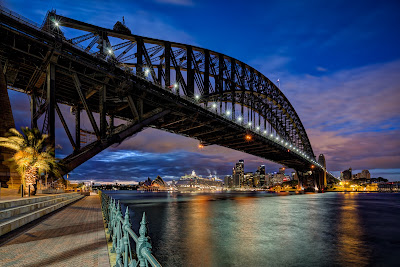
 
The design of your lens aperture diaphragm and the aperture setting you select has a profound impact on the starburst effect.  You should also know that differing lenses, even within the same brand, let alone altering brands, will have vastly different characteristics to the look of this effect.  If the aperture blades form a perfect circle, you will not get the starburst effect.  Instead, you will have distant highlights producing Airy Discs on your image which may be so small, you may not even see them.

Here are some tips to get you started with Starburst effects in night photography:

Tip 1:  Test and practice starburst effects at home with your lenses.  Use a flashlight to create the distant point source of light.  Set up your camera on a tripod so you can alter your aperture and change your shutter speed to accomplish the correct exposure.  Take a series of pictures with each lens, using f/8.0, 11, 16 and 22.  You will learn very quickly just how differently your lenses create the starburst effect and just how different the effect looks.  Depending on the number of aperture blades, you will see various numbers of points of light. The result of this process will help you to really know your lenses for the ideal starburst effect.
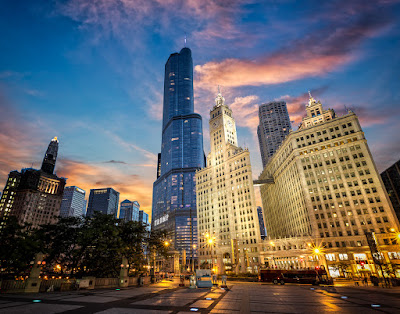
Tip 2:  Use smaller apertures to create more defined points of light. Usually that would mean a minimum of f/11 if not f/16 or f/22.  It’s strange how this works, but technically, if you have an even number of aperture blades, you will get that many points of light.  If you have an odd number of aperture blades, you will get twice the number of points of light.  So, 6 Blades equals 6 spikes of light, but 7 Blades will equal 14 spikes.

Tip 3:  Beware of filters!  Filters over the front of your lens can and usually do cause flare from point light sources.  They can also cause you to not achieve the starburst effect you are looking for.  Try removing any UV or other glass in front of the front element of your lens and you should achieve a much better result.

Tip 4:  Get the right exposure.  Exposure affects the intensity of the starburst effect.  The longer the exposure, the more star effect you will see.  The brighter the highlights in a photo and depending on how much contrast is in the scene will all influence how much you will see the starburst effect.

Tip 5:  Subject to lens distance will influence how large the starburst effect appears.  Often, if the point source of light is up against an object partially blocking it, like a building or bridge, or even the sun at the horizon, this will make the starburst effect more pronounced. Of course, the relative size and brightness of the point source as well as the quality of light overall will have an effect.  Nothing takes out a starburst effect quicker than a bunch of haze, smoke or fog.

John Williams is a passionate and accomplished photographer living in Lake County and a longtime member of the Lake County Camera Club and CACCA community. Modern digital photography presents the perfect intersection of technology and art that John has found totally engaging with his technically inclined interests.  While John enjoys a wide variety of photographic styles and subjects, his favorites include Architectural, Landscapes, Cityscapes, Travel and Night photography. 


John will be presenting "Night and Low Light Photography"  at CAPS-Chicago Area Photography School on Sunday, November 19th.

To see the entire schedule of classes go to: caps.caccaweb.com or click here:  Home

To register go to:   Chicago Area Photographic School (CAPS) 2017 | Summary | powered by RegOnline


Wednesday, November 8, 2017

"Photography 101: A look at Backgrounds" by Mike Trahan

CAPS has many classes that dive deep into a specific subject. But what if you’re a relatively novice photographer or someone who has more experience but isn’t sure if you have all the essential basics mastered yet? If you fall into those categories, then this class is for you.

We’ll pick out the key practical essentials you need to know to consistently take better pictures. We’ll only get technical where we really have to and only where it matters to you.

Here’s a general outline of what we’ll discuss:
n  Some Fundamentals
         Telling a story / capturing the mood
         Types and quality of light
         Composition
n  Practical Technical Stuff You Need
n  Gear – Lots of Choices

As Albert Einstein once said, we’ll try to make things as simple as they can be, but no simpler. Let’s take a look at one of the specific topics we’ll cover in the class.

Backgrounds

After you’ve picked your main subject, you need to really pay attention to the background. Often we’re so focused on our subject, we forget all about the background. You want to make sure that it doesn’t detract from your subject, clutter the picture for your viewer, or draw their eyes away inappropriately. And sometimes the background can enhance your subject and help tell your story.

So look at these pictures: 


In the first one, there are elements in the background on the left and in the upper right corner that add no value but do add distraction. Plus the one in the upper right is brighter as well and your eyes go naturally to bright areas drawing them away from the subject. In the second picture, changing where we stood eliminated those distractions and is clearly better. Now if my granddaughter would only smile.

Here’s another example where just changing where we held the camera and getting down low made a dramatic difference in the photograph:


And another similar example where getting closer and a little  lower had the same effect:


So your first thought on backgrounds needs to be: SIMPLIFY. Remove distractions where you can.

But a background doesn’t need to be plain or empty. It can add to the picture immensely also. In this next example, we were in a King Penguin colony of over 200,000 birds on South Georgia Island near the Antarctic. I wanted to show an intimate scene of parent birds and their chicks (the brown ones), but also convey a sense of the vast number of birds surrounding them. I hiked to a low ridge where I thought I could isolate a few birds on the back side of the ridge but with a large separation from the other birds giving me the ability to blur them with a lower depth of field. And, viola, the picture I wanted! It reminds me of my kids saying but Dad, one of them did it.


 We’ll cover backgrounds with a few more examples in the class as well as the other key factors you need to know to take better pictures, no matter where and no matter what. See you at CAPS!


Mike Trahan enjoys shooting a wide variety of photos with a special emphasis on nature and birds.  You can check them out at Zenfolio | Michael (Mike) Trahan photos. He's won many honors including the first Stewards of the Upper Mississippi Bald Eagle photo contest, first place winner in the Ottawa National Forest photo contest, and Lake County grand prize winner with a picture used on four 20' x 50' billboards along the expressways.  Mike was the recipient of the 2015 CACCA Kohout award for nature photography teaching.  What really matters though is that he really enjoys photography, sharing what he's learned with you, and having fun doing it.

Mike will be presenting "Photography 101: Taking Better Pictures" at CAPS- Chicago Area Photography School on Sunday, November 19th.


To see the entire schedule of classes go to: caps.caccaweb.com or click here:  Home

To register go to:   Chicago Area Photographic School (CAPS) 2017 | Summary | powered by RegOnline


Friday, November 3, 2017

"Hidden Gems of Chicago" with Chris Smith

In the Chicago suburbs we live near one of the most architecturally interesting cities in the world. There are photographic subjects around every corner, but they’re not always easy to find!

In my presentation, Hidden Gems of Chicago, I’ll show you my favorite little-known photo locations in Chicago. We’ll go beyond The Bean, Buckingham Fountain and the Chicago Skyline to discover my favorite interiors, vantage points and out-of-the-way architecture.


Along the way, you’ll get tips for shooting interiors, photographing the city at night, post-processing your Chicago images and how to create unique images in these locations.


This year I completely rewrote The Photographer’s Guide to Chicago. You can download the 2nd edition of the ebook at outofchicago.com/ebooks.


Chris Smith is the founder of Out of Chicago Photography. Out of Chicago runs their annual photography conference every June. Chris is the author of The Photographer’s Guide to Chicago and host of the Out of Chicago Podcast. 
You can follow Chris Smith's photography adventures at outofchicago.com  Photography Online Courses, Workshops, Conferences, Outings | Out of Chicago

Chris will be presenting "Hidden Gems of Chicago" at CAPS- Chicago Area Photography School on Saturday, November 18th.

To see the entire schedule of  CAPS-Chicago Area Photography School classes go to: caps.caccaweb.com or click here:  Home

To register go to:  Chicago Area Photographic School (CAPS) 2017 | Summary | powered by RegOnline


Wednesday, November 1, 2017

"Drips, Drops & Illusions" with Nick Sinnott

This is a class you can come and have fun in.  Bring your camera and get some interesting shots. 
During the class, you will learn the basics of using strobes (off-camera flashes) in combination with macro photography to create stunning images with items found in your house.  After seeing the various methods demonstrated, you will also put what you learned to practice and begin to create Drips, Drops & Illusion photographs during the class. You will have an opportunity to test your hand at photographing fruits, vegetables and other items splashing into a tank of water!
Nick will be presenting "Splash Photography" at CAPS, Chicago Area Photography School on Sunday, November 19th. 


Nick Sinnott is a Partner and Director at Richard Stromberg’s Chicago Photography Classes.  He has taught all levels of photography for 5 years and has written the curriculum for several classes including the popular Drips, Drops and Illusions Workshop and Lightroom In-Depth 7-week Class.  As a photographer, he enjoys photographing landscapes, sports, architecture, real estate and his family of 4 children and amazing wife.

Smug Mug:  foreshots


To see the entire schedule of  CAPS-Chicago Area Photography School classes go to: caps.caccaweb.com or click here:  Home

To register go to:  Chicago Area Photographic School (CAPS) 2017 | Summary | powered by RegOnline

Sunday, October 22, 2017

"Creating Stunning Reflections" by Steve Gettle

As a photographer I find reflections to be a fun and artistic tool, offering many creative possibilities. For this reason, I am always excited when the opportunity arises for me to include them in my compositions. From the viewers perspective, reflections add interest to images by challenging their visual perception.

Being a nature photographer, the reflective surface appearing most often in my images is water. When water is perfectly still it takes on a magical mirror like quality that is very beautiful. In situations like this I often like to create images that celebrate the symmetry between the main subject and its reflection, as in this image of a Blacksmith Plover from Africa.

When creating images like this I make every effort to keep the image clean and simple, working hard to eliminate anything in the composition that will detract from the symmetry.

This next image is from a canyon in Utah. It celebrates another type of reflection I like to play with, which I call a “light reflection”. For this composition, I have included a shaded section of stream. Reflected in the water of this stream is a red rock wall that is fully lit by the rising sun, creating a beautiful stream of molten gold. Surprisingly I often use a polarizer when creating images like this. Which seems counter-intuitive because polarizers are often used to remove reflections but in this instance I will use the polarizer to intensify the colors. I look through my camera as I rotate the polarizer until I get the effect I like.


For this image of a Wood Duck pair created in Ohio I have combined both principals. In addition to the duck’s reflection we also have a reflection of sunlit foliage reflected in the water around them which adds a serious “punch” of color to the background. To maximize this effect, it is important that the sunlit reflection be reflected in a shaded part of the water.


When creating images of reflections changing your perspective either higher or lower will often have a big impact on the quality and position of the reflection in your final image. So find the elevation which creates the best reflection and composition then make your image. Also on a technical note, when I am making images like this I tend to stop the lens down a bit more ensuring I can keep both the main subject and the reflection itself sharp.


Good Luck and Good Light!

Steve


Over the course of his 30-year career, Steve Gettle has spent countless hours creating hundreds of thousands of photographs capturing nature’s beauty around us. Steve’s images communicate his love for the wildlife and the wild places of our world. He has had his images shown in many exhibitions and publication.  Steve especially enjoys sharing his knowledge through both private and group location-based experiences focused on individual nature photography development in once-in-a-lifetime locations.

Wilderness Images
The Nature Photography of Steve Gettle
8877 River Valley Ct.
Brighton, MI 48116
Office 810-231-8118
Fax 810-231-8119
Facebook: http://www.facebook.com/steve.gettle

Steve will be teaching "Frozen Moments: High Speed Nature Photography" on Saturday, November 19th.
Steve's program is sponsored by Cognisys - Capture the Hidden World
To see the entire schedule of  CAPS-Chicago Area Photography School classes go to: caps.caccaweb.com or click here:  Home

To register go to:  Chicago Area Photographic School (CAPS) 2017 | Summary | powered by RegOnline

Saturday, October 14, 2017

"Targeted Adjustments for Creative Results" by Bob Marin

There are several excellent image-editing programs that can be used to produce great images.  When I want to go beyond the usual image editing, I want the more powerful features of Photoshop.  For this article, I will describe my workflow - how I use Camera RAW and Photoshop CC to edit images.

Since I shoot exclusively in RAW format, my workflow starts in Camera Raw where I click one of my saved presets that I have created.  These establish the starting values for the following:  White Balance (As Shot), Clarity, Vibrance, Saturation, Point Curve, Sharpening, Noise Reduction, Lens Profile, and Dehaze.  Then I evaluate the image to see if the chosen preset gives me a good starting point.  Next, it  is the time for critical adjustment of White Balance and tonal balance - Whites, Blacks, Highlights and Shadows adjustments in that order.  I usually leave the Exposure and Contrast slides at zero.  I am disciplined to use the right meter mode and compensation when needed so I rarely need an Exposure adjustment and I prefer to leave Contrast adjustment for a later Curves adjustment.  Once I am satisfied with these basic adjustments, I move on to more exact adjustments of elements within the image.  For these edits, I’ll use Photoshop.

One of the most valued Photoshop features is the ability to use layers.  This yields a non-destructive workflow that can be altered at any time without any destructive effect on the original image.  A layer can be the original image (the actual image pixels), a duplicate of the image, a different image, a “Fill” or “Gradient” layer, or an “Adjustment” layer.  Each layer can also have a layer mask – some are added as soon as the layer is created or you can add a mask later.  Layer masks allow one to make minor or very sophisticated and targeted adjustments.  A layer mask can also be used to block image ingredients that are not wanted.

This is a good time to mention some restrictions.  If you are preparing an image for a Creative competition, you can charge on – there are few restrictions.  Just make sure that all the image ingredients are your original captures.  Most applies equally to a Pictorial competition with, perhaps, holding back on wild extremes (for example use of unnatural or abnormal colors).  If you are considering submitting your image into a Nature competition, the story is quite different.  Only very basic adjustments to a nature image are allowed.  Know where your image is headed and know the rules.

To demonstrate a layer mask, let’s use this image of a tiger.
We can add a “Black & White” adjustment layer to extract the color and convert to a monochrome image.  This also automatically adds a “Reveal All” layer mask.  The mask is filled with white.  When working with masks the saying is: “White Reveals and Black Blocks”.  To demonstrate, let’s turn our tiger into part white tiger and part normal tiger – think of it as a tiger with a split personality.  By painting with a black brush ON THE MASK, we restrict the adjustment layer to only those areas where the mask is still white.


Here is an image of the layer mask and the effect it has on the image.


Looking at the mask, you can see some important attributes.  The white area allows the adjustment layer to be active while the black areas restrict or blocks the adjustment and the image remains in full color.  Note the fuzzy edges where the use of a soft brush allows a more subtle transition.  Also note the circle of black that allows the natural eye color to show.  The same is true for the tiger’s mouth.

Here is another example (and its layer mask) where the background layer (the actual image) has been made an active layer by double clicking on the image layer in the layer window.  This allows you to add a new background layer below the image layer.  In this example, I filled the new bottom layer with a subtle dark green color. Next, I added a “Reveal All” layer mask to the image layer.  Now when you paint with a black brush on the mask you will block (or rather, eliminate) the distracting elements in the background and leave a cleaner image with higher impact.


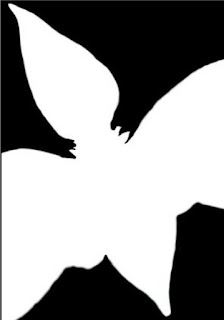
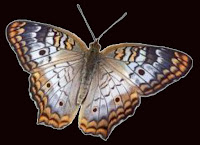
You can also use this approach in another way.  For example, let’s sharpen the butterfly but nothing else.  Start by duplicating the image layer and then apply the desired degree of sharpening to the new duplicate image.  Now apply a layer mask to the sharpened layer.  If you use a “Reveal All” layer mask, paint everything black except the butterfly, or use a “Hide All” layer mask and only paint the butterfly using a white brush.  Here is an image of the “Hide All” layer mask that was used above to reveal the sharpen butterfly.


Once you have created a working layer mask, you also have a selection.  Just right click the layer mask and choose the option “Add mask to the selection”.  If there was no selection active before you took this step, you will now have an active selection of the image that is ‘revealed” by the white area of the mask.  Since you needed the layer mask to creative the desired changes to your image you can appreciate the fact that the selection comes virtually free.  And, you do not have to save the selection for as long as you retain the mask, access to the selection is still there.  Now the question becomes “What can I do with it?”

We have been using layer masks to achieve targeted adjustments.  You can also use a layer mask to add an additional image element to another image, or you can use the selection to copy an image element to paste it into a different image.  These are just different ways to achieve the same result.  In some cases one or the other method will be best – it depends on what creative result you are trying to achieve.  Also, there will be times when a more accurate, tighter selection may be required.  We’ll end this discussion with a final example of where you can go from here…

Bob Marin started his photographic hobby at an early age right after earning a few dollars and visiting a pawn shop that had an Argus C3 in the window.  Serving the government led him to Germany (land of Leica) and the hobby got a lot more serious. Earlier years, as well as now, were spent mainly on strict Nature photography.  However, creative allows one to strike a balance.  Bob had early influences through CACCA and a friend, a Lithographer, who introduced him to Kodalith, Diazachrome and 3M Color Key ... the magic began.   This may all sound foreign in today's digital age, but Bob has dug into the depths of Photoshop, and the Creative Life got easier!!! No more toxic and smelly chemicals. 


Bob Marin will be teaching "Techniques for Creative Images" on Sunday, November 19th.

To see the entire schedule of classes go to: caps.caccaweb.com or click here:  Home


To register go to:   Chicago Area Photographic School (CAPS) 2017 | Summary | powered by RegOnline

Saturday, October 7, 2017

"Understanding Your Camera's Light Meter" by Keith French

Once considered a fundamental skill in photography, reading and interpreting your camera’s light meter has nearly become a lost tool in the world of digital photography.
Today’s digital camera’s, whether in the form of a phone or an actual stand alone camera have some pretty sophisticated light reading abilities. Especially when compared to what professional photographers had at their disposal just a short 15 years ago.  With the increase in light sensitive materials and other physical components used to transfer the information of reading light to a digital or electronic signal, came the much more sophisticated algorithms for interpreting that information and creating a solution in the form of great dynamic exposure (a perfect balance between the light and dark portions of the image based on all the settings chosen by the photographer)

My experience as a camera store owner while teaching budding photographers how to improve their skills was that the light meter was the last thing many of these “students” of photography wanted to learn about. I cannot be sure exactly but I think because when they shot on AUTO, they only needed to worry about catching the moment, and composing it in the view finder and the camera took over making many decisions for them.  And rightly so, the decision process going into making a great image is layered in a thought process of “Yes – No – Do This”  check lists that eventually become nearly automated in our own brain as we grow in our skill.  While developing this skill many photographers heavily rely on the automated shooting modes like AUTO or PROGRAM of their camera.  Some never grow past this, others eventually realize as they advance in their learning and gain a more developed eye for details that they need to have more input into the thought process of creating that image.

That is the artist I’m reaching out to.  This learning process has somehow been reversed. The light meter, and it’s very close relative the histogram, are the only components of the camera that are actively communicating back to you. The operator of a very complicated and highly capable devise, otherwise known as a camera. To further appreciate that description pick up a Kodak Brownie at a garage sale and disassemble it. You’ll see it’s not much more than a small “shoe box” of a device still capable of creating world class art in the hands of an individual who has learned to read and capture light. That device didn’t have a light meter. So the individual had to spend hours, if not years mastering light. Today you have an open book test in front of you every time you set up an image. The answers are all right in front of you, all you have to do is interpret the data and make a few decisions. Mastering the light meter will save you hours in post processing, teach you how to better read light, and give you the control you’ll enjoy having when setting up and creating that perfect image in a highly dynamic lighting situation.

So where is the light meter in your camera?  Chances are you have looked at it numerous times and looked right past it. It’s usually in the bottom of your viewfinder or screen in live view and it looks similar to this:

I have added the red arrows and the text so you know what it is telling you, but there it is.

You also need to under stand the 4 modes you have available as far as light meter settings go. In other words, where is the meter measuring the light? 

Here are 4 examples of relative measuring:


The area in blue is where the camera is “looking” when it reads the light and provides you feedback via the light meter.


Having the right setting and following it’s advise takes you from this:


 to this:
 Now I’ve been on social media, and I’ve seen plenty of images where the general public lauds praise on the former image, but you don’t need to have too discerning of an eye to see the difference.  It’s was an easy setting change from one metering mode, in this case Evaluative, to Partial.  Of course knowing to make this setting change ahead of time saved a lot of post processing corrections.

So much money has been invested in research and development by the manufactures of your devises you use to make images that you may want to consider understanding why, especially if you are looking to take your skill and presentations to the next level. Eventually a few quick decisions, and setting adjustments as you approach a scene or activity and you are on your way. It doesn’t have to be hard and the manufactures went out of their way to make it as simple as they can so you use it.  Unfortunately the process in which many have learned photography bypassed this tool altogether. 

At CAPS we are going to unpack the light meter modes, explain it, show samples, and explore the light meter in your devise. Getting the proper exposure to this old film shooter means getting it right in the camera, so I can spend more time shooting and less time post processing.  

Keith French has been a full time professional photographer since 2001 with an extensive background in several types of photography dating back to 1984.  His years as an owner of a full service retail camera store, Photo/Video studio, and commercial color and B & W photo lab, gave him a unique look into the full circle of the photographic industry. Buying and selling equipment and accessories, hosting and teaching photography classes and workshops, shooting and printing, combined with his time as a United States Marine Corps Aviator and the travels that were associated there. Keith has a well-rounded repertoire of photographic experience on 4 continents and 3 oceans.

Keith currently runs workshops with Tony Reynes and Out of Chicago


Workshops:  http://kfrenchphoto.com/photo-workshop/  Hands On Photographic Workshop

Keith French will be teaching "Get the Right Exposure, Understanding Your Camera's Meter" at CAPS-Chicago Area Photographic School on Saturday, November 18th.

To see the entire schedule of classes go to: caps.caccaweb.com or click here:  Home

To register go to:   Chicago Area Photographic School (CAPS) 2017 | Summary | powered by RegOnline


Saturday, September 30, 2017

Winter Light-Getting the Exposure Right by Joe Rakoczy

Forget what the calendar says. For Upper Midwesterners winter arrives early and leaves late. The further north you travel around the Great Lakes, the longer winter sticks around - and the better the opportunities are for photographing ice and snow.

Winter can transform the landscape beautifully.  Snow covering tree branches and blanketing the land can appear magical. The solitude and quiet can be stunning.  You may find yourself all alone in spots overrun with people in warm weather months.  (And vice versa, if there’s a winter festival on a frozen lake or a dogsled race through a forest.)  And, of course, there are no mosquitoes (or ticks, or horseflies, …)

While winter days are shorter, the sun stays lower and the longer daily periods of   “photographer’s light” can lead to outstanding photography. Skies are often a deeper blue. Textures can be more pronounced.  Even on cloudy days, a blanket of snow creates a massive light reflector that better illuminates trees, rock faces, buildings, people and animals.

But among the challenges of winter photography, capturing that winter light and properly exposing for snow and ice while still revealing important detail and texture in the snow and other elements within your image, ranks as one of the toughest. 

Mid-day sunny conditions, glare off snow, and backlit ice, can fool your camera’s light meter into underexposing images, resulting in unappealing dull, dark or gray tones.  Why does this happen? Your camera’s meter is designed to capture an average medium gray exposure at normal camera exposure settings. If your camera’s viewfinder is filled with a completely black subject like a non-reflective black wall, without upping either your aperture (using lower f-stop) or lowering your shutter speed or decreasing your ISO/sensitivity, your image will be a middle gray instead of black.  Same goes if you aim it at a completely white wall. 
So you need to find a way to take control and override or “trick” your camera’s meter into getting the exposure you want.

Shooting in Raw instead of only JPEG, makes much more sensor data available (as indicated by Raw image files being much larger than JPEG files), enabling you to correct many image exposure and color rendition problems in post-processing.   So for serious photography we recommend you shoot in raw (plus JPEG).  Note that virtually all raw images will require imaging editing on the computer using raw conversion software such as available from your camera’s manufacturer, or in Photoshop Elements, Photoshop, and Lightroom.    

But whether or not shooting in raw, getting the best image capture in-camera is the way to go, assuring you the best opportunities for creating excellent images.

Listed below are some things you can do - individually or in combination - toward getting a correct exposure of snow and ice scenes.

By the way, for our more serious winter landscape photography we typically shoot using tripods with our DSLR cameras set on aperture-priority mode (camera “A” mode setting). Typical aperture setting is our lens’ “sweet spot” f-stop setting (aperture yielding the sharpest focus), which is about f11, or for more depth of field, f16 or f18.

Increase exposure   While many/most modern cameras with multi-point metering (e.g. 51 point matrix) often achieve fairly accurate snow scene exposure, if most of your viewfinder is filled with bright snow or there’s a lot of glare anywhere in the frame, you’ll need to – and this seems counterintuitive - increase your exposure from what your camera gives. Set your exposure value compensation (EV +/- button and slider) between ½ to 2 f-stops higher than your camera indicates.  In playback/review mode, immediately look at your LCD screen to check your exposures and re-adjust the EV compensation accordingly if necessary.

Bracket exposures  Take multiple shots over a range of exposure settings in 1/2 or 2/3 f-stop increments.  Many camera models have automatic bracketing allowing you to preset your camera for uniform shooting of three, five, seven or nine total shots at different exposures. Bracketing this way just about guarantees you’ll get at least one good exposure.
Use your histogram  In playback/review mode, check your image’s  tonal/luminance histogram on your LCD screen.  The histogram is a graph showing dark tones on the left and light tones on the right. Adjust exposure value (EV) compensation {the button for it has this symbol: +/-} and reshoot if necessary to keep the curve to the right but without climbing the right side wall, which would indicate hot spots/blown out details.

Use your spot meter  Most DSLRs have a spot meter camera meter function allowing you to take a light reading off a single small area within your frame instead of the entire frame.  Choose a point that’s in the same light as your subject and that’s approximately a medium gray like a lighter part of a blue sky, or a medium toned tree trunk, jacket or backpack/camera bag.  Either hold the exposure button down if your camera has one and take the shot, or check the reading and switch to manual mode to set the same settings.

Use an 18% Gray Card This is pretty much and adjunct to the previous tip. Buy/borrow a gray card from a camera store. Hold it in approximately the same light as your subject and shoot at the same settings as the reading off the card.

Shoot in HDR (high dynamic range) For very high contrast lighting conditions where the camera can’t capture the wide range of tonal values within the scene (as indicated by not capturing the entire histogram curve within its boundary walls), shoot in HDR. Using a tripod or other support, bracket exposures as described but save the exposures and use them in HDR software such as Photomatix Pro, Nik HDR Pro, or Photoshop.  Some modern cameras allow for in-camera HDR shooting and image processing.

Shoot Raw Repeating it again here for emphasis: shooting in raw affords you the widest exposure latitude and best white balance adjustment capability in post-processing.

Using the above camera techniques should lead to getting the exposure you want.  Keep in mind though that they all globally affect your images.  With many of your images you may find yourself having to selectively tone down or brighten certain areas using image editing tools. 
-----------------------------------------------
Side Note: Going retro - in the pre-digital days of film cameras, if your camera didn’t have a light meter or you didn’t have a handheld meter, or its battery died, you might resort to using the Sunny Sixteen Rule. (Remember with film there is/was no instant gratification image playback/review mode. You’d generally have to wait days to see if you got a correct exposure.) This rule of thumb was fairly accurate.  For sunny day brightness with harsh shadows, and your camera set at f16, and no light reducing filter on your lens such as a polarizer, you’d shoot at a shutter speed of 1 over your ISO (it was ASA back then).  So if your ISO was 100 you’d try shooting at 1/125 second (1/100 wasn’t a standard setting) at f16.
Copyright ©2017 Joe Rakoczy


Joe and Marie Rakoczy are avid photographers and especially enjoy cold weather photography. They’ve produced a number of travelogues as well as several educational programs. Both are TOPs in CACCA winners and Joe was the recipient of CACCA’s 2016 Wanda Crystal Award for photographic and artistic excellence.  Marie was the first PSA Chicago Chapter recipient of the new PSA Portfolio Award.  Their articles and photos have appeared in several publications, including an article about winter photography entitled "The Magic of Lake Ice" in the December PSA Journal.

Joe and Marie will be presenting "Winter Up North" a how to prepare for and photograph the beauty of winter at CAPS on Saturday, November 18th.

To see the entire schedule of classes go to: caps.caccaweb.com or click here:  Home

To register go to:   Chicago Area Photographic School (CAPS) 2017 | Summary | powered by RegOnline