There are several excellent image-editing programs that can
be used to produce great images. When I
want to go beyond the usual image editing, I want the more powerful features of
Photoshop. For this article, I will
describe my workflow - how I use Camera RAW and Photoshop CC to edit images.
Since I shoot exclusively in RAW format, my workflow starts
in Camera Raw where I click one of my saved presets that I have created. These establish the starting values for the
following: White Balance (As Shot), Clarity,
Vibrance, Saturation, Point Curve, Sharpening, Noise Reduction, Lens Profile,
and Dehaze. Then I evaluate the image to
see if the chosen preset gives me a good starting point. Next, it is the time for critical adjustment of White
Balance and tonal balance - Whites, Blacks, Highlights and Shadows adjustments in
that order. I usually leave the Exposure
and Contrast slides at zero. I am
disciplined to use the right meter mode and compensation when needed so I
rarely need an Exposure adjustment and I prefer to leave Contrast adjustment
for a later Curves adjustment. Once I am
satisfied with these basic adjustments, I move on to more exact adjustments of
elements within the image. For these
edits, I’ll use Photoshop.
One of the most valued Photoshop features is the ability to
use layers. This yields a
non-destructive workflow that can be altered at any time without any
destructive effect on the original image.
A layer can be the original image (the actual image pixels), a duplicate
of the image, a different image, a “Fill” or “Gradient” layer, or an “Adjustment”
layer. Each layer can also have a layer
mask – some are added as soon as the layer is created or you can add a mask
later. Layer masks allow one to make minor
or very sophisticated and targeted adjustments. A layer mask can also be used to block image
ingredients that are not wanted.
This is a good time to mention some restrictions. If you are preparing an image for a Creative
competition, you can charge on – there are few restrictions. Just make sure that all the image ingredients
are your original captures. Most applies
equally to a Pictorial competition with, perhaps, holding back on wild extremes
(for example use of unnatural or abnormal colors). If you are considering submitting your image
into a Nature competition, the story is quite different. Only very basic adjustments to a nature image
are allowed. Know where your image is
headed and know the rules.
 To demonstrate a layer mask, let’s use this image of a
tiger.
To demonstrate a layer mask, let’s use this image of a
tiger.
We can add a “Black & White” adjustment layer to extract
the color and convert to a monochrome image.
This also automatically adds a “Reveal All” layer mask. The mask is filled with white. When working with masks the saying is: “White
Reveals and Black Blocks”. To
demonstrate, let’s turn our tiger into part white tiger and part normal tiger –
think of it as a tiger with a split personality. By painting with a black brush ON THE MASK,
we restrict the adjustment layer to only those areas where the mask is still
white.
Here is an image of the layer mask and the effect it has on the image.


Looking at the mask, you can see some important
attributes. The white area allows the
adjustment layer to be active while the black areas restrict or blocks the
adjustment and the image remains in full color.
Note the fuzzy edges where the use of a soft brush allows a more subtle
transition. Also note the circle of
black that allows the natural eye color to show. The same is true for the tiger’s mouth.
Here is another example (and its layer mask) where the
background layer (the actual image) has been made an active layer by double
clicking on the image layer in the layer window. This allows you to add a new background layer
below the image layer. In this example, I
filled the new bottom layer with a subtle dark green color. Next, I added a “Reveal
All” layer mask to the image layer. Now
when you paint with a black brush on the mask you will block (or rather, eliminate)
the distracting elements in the background and leave a cleaner image with
higher impact.

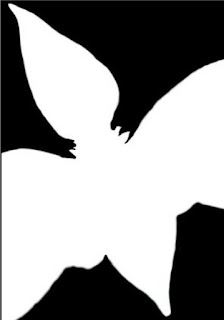


You can also use this approach in another way. For example, let’s sharpen the butterfly but nothing else. Start by duplicating the image layer and then apply the desired degree of sharpening to the new duplicate image. Now apply a layer mask to the sharpened layer. If you use a “Reveal All” layer mask, paint everything black except the butterfly, or use a “Hide All” layer mask and only paint the butterfly using a white brush. Here is an image of the “Hide All” layer mask that was used above to reveal the sharpen butterfly.
 Once you have created a working layer mask, you also have a
selection. Just right click the layer
mask and choose the option “Add mask to the selection”. If there was no selection active before you
took this step, you will now have an active selection of the image that is
‘revealed” by the white area of the mask.
Since you needed the layer mask to creative the desired changes to your
image you can appreciate the fact that the selection comes virtually free. And, you do not have to save the selection
for as long as you retain the mask, access to the selection is still
there. Now the question becomes “What
can I do with it?”
Once you have created a working layer mask, you also have a
selection. Just right click the layer
mask and choose the option “Add mask to the selection”. If there was no selection active before you
took this step, you will now have an active selection of the image that is
‘revealed” by the white area of the mask.
Since you needed the layer mask to creative the desired changes to your
image you can appreciate the fact that the selection comes virtually free. And, you do not have to save the selection
for as long as you retain the mask, access to the selection is still
there. Now the question becomes “What
can I do with it?”
We have been using layer masks to achieve targeted
adjustments. You can also use a layer
mask to add an additional image element to another image, or you can use the
selection to copy an image element to paste it into a different image. These are just different ways to achieve the
same result. In some cases one or the
other method will be best – it depends on what creative result you are trying
to achieve. Also, there will be times
when a more accurate, tighter selection may be required. We’ll end this discussion with a final
example of where you can go from here…

 Bob Marin started his photographic hobby at an early age right after earning a
few dollars and visiting a pawn shop that had an Argus C3 in the window. Serving the government led him to Germany
(land of Leica) and the hobby got a lot more serious. Earlier years, as well as
now, were spent mainly on strict Nature photography. However, creative allows one
to strike a balance. Bob had early influences through CACCA and a friend, a
Lithographer, who introduced him to Kodalith, Diazachrome and 3M Color Key ... the
magic began. This may all sound foreign in today's digital age, but Bob has dug into the
depths of Photoshop, and the Creative Life got easier!!! No more toxic and smelly chemicals.
Bob Marin started his photographic hobby at an early age right after earning a
few dollars and visiting a pawn shop that had an Argus C3 in the window. Serving the government led him to Germany
(land of Leica) and the hobby got a lot more serious. Earlier years, as well as
now, were spent mainly on strict Nature photography. However, creative allows one
to strike a balance. Bob had early influences through CACCA and a friend, a
Lithographer, who introduced him to Kodalith, Diazachrome and 3M Color Key ... the
magic began. This may all sound foreign in today's digital age, but Bob has dug into the
depths of Photoshop, and the Creative Life got easier!!! No more toxic and smelly chemicals. Bob Marin will be teaching "Techniques for Creative Images" on Sunday, November 19th.
To see the entire schedule of classes go to: caps.caccaweb.com or click here: Home
To register go to: Chicago Area Photographic School (CAPS) 2017 | Summary | powered by RegOnline
No comments:
Post a Comment