Saturday, November 14, 2015

"Get Off Your Butt and Go Shoot" by Chris Smith

As photographers, we can't wait for the day that we can pack up the car or jump on a plane to take our next big photo adventure. But we live near one of the greatest cities in the world for photography! Chicago offers opportunities for street photography, architectural photography, and cityscape photography. You can decide at 3pm that you want to get out to shoot and you'll be shooting great stuff all evening. Here are some of my favorite places to shoot in Chicago.

The Best Interiors
Chicago's churches, museums, and universities in Chicago offer a wealth of amazing interiors.  My favorite churches are St. Mary of the Angels, Holy Name Cathedral, and Rockefeller Chapel.  The best museums to photograph are the Museum of Contemporary Art and the Chicago Art Institute. The staircase at the Museum of Contemporary Art is a destination on its own. You can also have a great day shooting at either the Shedd Aquarium or the Museum of Science and Industry. Head to the University of Chicago for a day of great interiors and architecture.

Cityscapes
If you are a landscape photographer, have you tried shooting cityscapes? The techniques are the same. The equipment is the same. And you can get stunning results in Chicago. The Hancock Building and North Avenue Beach are my favorite places to shoot the city. Adler  Planetarium gives you the best view of the city, but it's not easy to get a unique shot.  Just like with landscape photography, you'll get your best shots at the edges of the day. Plan your trip to be there at dawn or dusk. I prefer to go for sunset because then I can keep shooting into the night.

Architecture
This is where Chicago beats every other city in the world. Head down to the Loop to surround yourself with fantastic buildings. Wander the Riverwalk to shoot Marina Towers, Trump Tower, and others. If you've never shot architecture, this is the place to do it. When shooting architecture, avoid photographing the entire building. This is the view that everyone has of a building. Instead, concentrate on one part of the building. Look for an interesting pattern or shape, or unique point of view. By looking at the building in a different way, you make the image your art, not just the work of the architect.

Street photography
If you are looking to photograph people in the city, the best places are the Loop, Wicker Park, and Pilsen. My favorite is the Loop because you can also shoot the phenomenal architecture while you're there. Find the perfect background and wait for your subject to walk into it!

CAPS
In my CAPS presentation, Photographing Chicago, I will go in-depth about my favorite places to shoot in Chicago and give tips for getting great shots. I am squeezing everything I know and love about photographing Chicago into one 90-minute session. I'll tell you where you can use your tripod and where security will chase you away as fast as possible. I'll also give some tips for shooting Chicago at night. I hope to see you there!

Chris Smith is the founder of Out of Chicago Photography and the Out of Chicago Photography Conference. He is the author of "The Photographer’s Guide to Chicago" and host of the Out of Chicago Podcast. Chris specializes in photographing Chicago at night. By day, Chris is a high school physics teacher and lives with his wife and two kids in the Chicago suburbs. Follow Out of Chicago at  Out of Chicago Photography | The Chicago Photo Experience (outofchicago.com)
Out of Chicago will be at the CAPS conference and is offering CAPS specials on upcoming Out of Chicago events.


To go to the CAPS website go to:  Home


Thursday, November 12, 2015

The Grass is Always Greener? by Steve Gettle

No doubt about it most outdoor photographers love to travel to new and exciting locations to capture the subjects we love.  But truth of the matter is that most of us can’t be jetting all over the globe whenever we want.  Most outdoor photographers I know are able to take one two or maybe three major trips a year.  Sadly, I also know many photographers that only use there cameras when they are on one of these major trips.

But I would argue that those same photographers are missing one of the greatest locations available to them... there own backyard.  Most of us live within a short drive of a local park or piece of undeveloped land where we could practice our craft.  There are many benefits to working an area near your home.  One of the greatest benefits is simply being out there working, it is impossible to make great pictures if you are not in the field working.  Another important benefit of working close to home is the ability to go out on a moment’s notice, say when the lighting is really nice, or during unique weather conditions.  Also you can get to know a smaller piece of land and its inhabitants more intimately.  You can make sure you are there when the cardinals nest in that bush, or you photograph that patch of wildflowers when they are at their peak. 

Consider developing the area to suit your needs, get permission to put up some feeders and birdhouses to attract birds to the area.  Often times you can obtain permission from a developer to rescue wildflowers from an area that is going to be developed into another subdivision or strip mall.  Take these rescued flowers and transplant them onto suitable habitat where you will be able to shoot them.  Sure this is a long term prospect, but you will find these small steps payoff over the long haul with huge photographic dividends.

We all need to look at our own backyards with fresh eyes, the eyes of a traveler. Remember your backyard is very often someone else’s hot travel destination try to look at things with the eyes of a visitor, you will often be surprised by what you see.

Good Luck and Good Light!
Steve


Image: Crystal Balls, Dewdrops and Spider Web… from my backyard!


Wilderness Images
The Nature Photography of Steve Gettle
8877 River Valley Ct.
Brighton, MI 48116
Studio 810-231-8118
Fax 810-231-8119

Steve's photography has taken him throughout North and South America from the woods of northern Canada to the Cloud forest of Ecuador, from the coast of Maine to the high plateau of the desert southwest.  although he travels extensively, he finds much of his inspiration in the natural areas surrounding his home in Brighton, Michigan.  Steve leads photo workshops and tours all over the world.  As an instructor he has taught for such organizations as:  The North American nature Photography Association, The Rocky Mountain School of Photography, The Adirondack Photography Institute and many more.  He is a great nature photographer and will be teaching a half day class on both Saturday and Sunday, November 21st and 22nds at CAPS- Chicago Area Photographic School. Steve is being sponsored by Hunt's Photo and Video at CAPS.


To go to the CAPS website go to:  Home


Friday, November 6, 2015

"Flights of Fancy, Birds in the Air" by Walt Anderson

When pursuing avian flight photography there are several decisions you must make before taking a photograph.  One of the first is how you wish to show your subject and its motion.

If you wish to stop motion and show all the feather detail of a bird you will want to use a very fast shutter speed.  I would normally set my camera at 1/1000 of a second as a minimum. Often times with smaller and faster birds I will increase the shutter speed to as high as 1/2500.  When trying to photograph hummingbirds without using flash, I would go to an even higher shutter speed.  Because you want at least some depth of field, use an aperture setting of F5.6 to F8.  To achieve these fast shutter speeds and reasonable depth of field, you will need to use higher than normal ISO settings on your camera.  Luckily for us, each new generation of digital camera gives us better results at higher ISO's.  Depending on the amount of ambient light, I start at ISO 800 and increase it as needed.  I am often using ISO 1600 to 3200 to gain the shutter speeds I desire.

If you wish to show a sense of motion in your photograph of flight, you need to use a much slower shutter speed.  Start at 1/100 of a second and go slower from there depending on the size and speed of your subject.  I often find that a 1/60 or 1/50 of a second works well for me.  With this you will need to use the technique of panning with your subject. When trying to use slow shutter speeds to pan on bright days, you need to set your camera to a low ISO (100) and stop down the lens to F16 or F22 as necessary.  An alternative way to achieve slow shutter speeds is to use a neutral density filter or even a polarizing filter to block some light.  Panning with your subject to show motion while maintaining a somewhat sharp subject requires more practice than when trying to stop the birds motion.  You will need to allow yourself time to adjust to the speed and flight pattern of the bird.  I personally always try to have a least one portion of the bird in sharp focus (usually the head) when doing blurs, but that is an individual choice.

These photos were taken on the same day and location at Lock and Dam 14 on the Illinois side of the Mississippi River about twenty minutes apart.  The first was using a 1/1000 shutter speed and the second was at 1/60.

Walt Anderson is an award winning photographer/inventor specializing in wildlife, landscapes and Americana subjects.  In addition to being published in both books and magazines, he has sold prints at art shows, lead tours and workshops in North America, and is teaching photography classes at Morton Arboretum in Lisle, IL.

Inspired by Larry West at an early 1990’s workshop, Walt started to explore the capabilities of the new TTL flash units that were just being introduced.  He founded Visual Echoes Inc. to   produce and market his products including the Flash X-tender™ (also marketed under the name “Better Beamer”) and the Panning Plate.  He has shared his knowledge of the use of flash with his Sunshine in your Pocket program for many conventions and clubs and served as a mentor for the NANPA College Student Program.

Walt will be presenting his program at CAPS- Chicago Area Photographic School on Saturday, November 21st.

To go to the CAPS website go to:  Home


Sunday, November 1, 2015

Adjustment Order in Lightroom by Tim Grey

If you know about Tim Grey you probably have subscribed to his eNewsletter where he answers daily questions from readers about photography and Adobe software.  He has been doing this for 15 years.  Tim is one of our featured speakers at CAPS-Chicago Area Photographic School on November 21st and 22nd.  On Saturday he will be talking about workflow in Lightroom.  This will be  the full morning session on Saturday with a repeat in the afternoon.  For a full morning session on Sunday he will be talking about optimizing images in Lightroom and Photoshop.  On Sunday afternoon he will be talking about advanced adjustments in Photoshop.  Below is one of the sample questions that he gets.

Today's Question:
How do adjustments in Lightroom (for blacks, whites, shadows, clarity, vibrance, etc.) affect noise? Should noise be dealt with first or last, after all other adjustments?
Tim's Quick Answer:
In general concept, you can make changes to the various adjustments within Lightroom in any order at all, since the order you apply adjustments doesn't impact the actual effect of those adjustments. That said, it is important to evaluate the impact of one adjustment on another. For example, if you brighten up shadow detail you may need to increase the strength of noise reduction.
More Detail:

Lightroom employs a non-destructive workflow for your photos, meaning that when you are working in the Develop module you aren't actually changing pixel values in your original capture, but rather creating a set of adjustment metadata that is used to adjust the appearance of your photo within Lightroom, and as the basis of the processing for the photo when you export a copy of a photo.

Among other things, this means you don't need to apply your adjustments in any particular order to achieve a given result for a photo. In theory, for example, you would want to apply noise reduction before sharpening, so that the sharpening doesn't enhance the underlying noise. In the case of Lightroom (and also with Adobe Camera Raw), it doesn't matter whether you adjust the settings for noise reduction or sharpening first. All that matters is the final settings established for these controls.

To be sure, if the noise reduction adjustment doesn't eliminate the noise altogether, other adjustments may make the noise more visible or more problematic. For example, sharpening can serve to emphasize noise in an image, and brightening shadows can make noise more visible in the photo.
Any adjustment that enhances color or contrast, or that brightens up detail in the photo, has the potential to make noise more visible in the photo. But if the noise reduction settings you've applied cause the noise to be mitigated adequately, the effect of those other adjustments on any noise that remains will generally be relatively minor.

Tim Grey is a photographer who has written more than a dozen books for photographers, has published dozens of video training courses, and has had hundreds of articles published in magazines such as Digital Photo Pro and Outdoor Photographer, among others. He also publishes the Ask Tim Grey eNewsletter, the monthly Pixology digital magazine, and a wide variety of video training courses through his GreyLearning website. Tim teaches through workshops, seminars, and appearances at major events around the world.

Website: Tim Grey - Photographer, Author, Educator, Digital Imaging Expert 


To go to the CAPS website go to:  Home

To register for CAPS go to: Chicago Area Photographic School (CAPS) 2015 - RegOnline


Friday, October 23, 2015

"Better Composition-How to Work a Subject" by Don Bolak

In my upcoming CAPS presentation ‘Better Composition – How to Work A Subject’ my goal is to provide you with an overview of what I consider the essentials of the process of photographic composition and include various tips/tricks along the way.  One of the key topics I will review:  Is Your Subject Photo Worthy?

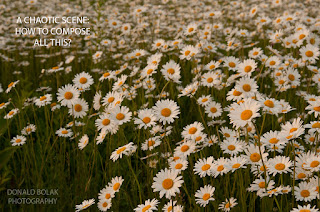
So what exactly am I talking about here?  Have you ever gone on a photo shoot and been overwhelmed with the number of possibilities?  You search and search and finally find something to get excited about.  You spend some time setting up, get your perfect shot, and go home a happy photographer.  Until you look at your images on the computer monitor and it turns out the shot was not that hot!  And then the regrets set in: What was I thinking!?  What a lost opportunity?  I cannot believe I thought that was great!  Check out these daisy images.  Which image would you rather see on your computer?

Being able to evaluate potential subjects in the field before you setup and start shooting is hugely beneficial and time saving.  You do not always have the leisure of time to take a shot.  Light is changing constantly during the golden hours for photography around sunrise and sunset.  Your animal, bird or insect subject may not wait around for you.  Even the wind may start to pick up and end your day for doing close up images of flowers.

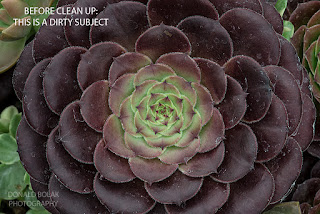
You also need to be able to look at subjects and determine if the subject is really that good.  One of the greater challenges you need to face:  what you see is not what you get in the camera.  The tools you are using to visualize your shot is a small view finder or a low resolution LCD screen.  It’s easy to miss things.  For close up photography -  trying to see flaws and dirt on that flower in a dark view finder at f22 is difficult.  I cannot tell you how much time I have to spend cleaning up images. I literally do not see all that crap in my view finder.  For this Aeonium picture – I did see that it was dirty and tried to clean it up in the field.  Since it was a potentially a great photo, I went ahead and shot it anyway.  I had no idea how dirty until I saw it on the computer monitor.  It took me hours to clean this up in photoshop.  No fun there.

Another way to think of it:  I just attended the Chicago Architectural Foundation’s Open House (if you are not familiar, check it out on-line).  I had 50 or so possible buildings to visit over the course of two days.  No way I was going to come even close to seeing that many buildings.  How to decide what to see?  A casual conversation with another photographer saved me from wasting time.  “Do not go to the XXX Building, the windows are filthy and you cannot get a good shot”.  If you were at that location, would you spend substantial time taking photo’s or would you have noticed the dirty windows and moved on to the next building?  I picked another high rise buiding to go to instead and got the following shot.  My thanks to that anonymous photographer.


Something else to consider: finding a worthy subject can take time.  Wild life photographers know this well and cultivate great patience.  It may take multiple excursions over the course of years to get that perfect mid-flight shot of that eagle.  Let’s look at another example:  for my flower photography, the sequence below took me about 3 months to get.  I thought the flowers had great potential but the plants do not produce a lot of flowers over the course of the summer.  So I had to wait for them to flower; wait for good conditions (lighting, wind, etc.); and finally wait for the perfect flower.  As you can see in the sequence below, I also had to learn from my mistakes - bad background, bad light, bad composition and bad subject (the 4 bads – now that’s BAD).  I improved over time until I finally had success.


Hopefully you are starting to get the idea.  You have to be able to decide what is interesting to you; edit the scene; evaluate the subject quality; AND THEN apply all your photographic tricks/techniques to get the great shot.  Hope to see you Sunday November 22nd at my CAPS presentation.

A serious hobbyist for over 15 years, Don has received numerous awards for his photography, exhibited widely and has been published in newspapers and magazines (most recently Natures Best Magazine).   While he pursues many different types of photography (abstract, landscape, garden, architecture, wildlife), his primary interest is botanical and close-up/macro photography.
He tries to portray the incredible diversity of color, form and subject matter found in the "micro world."

With a day job as a landscape architect, Don’s professional training in design and botany along with his expertise in photography makes him a popular speaker.  He has presented at past Chicago Area Photographic Schools, Lake County Expo, Out of Chicago Conference and other venues.
Website:  Donald Bolak Photography
        
To go to the CAPS website go to:  Home


Saturday, October 17, 2015

"101 Shades of Gray" presented by John Batdorff

I have great affection for the West which is renewed with every trip I make to Montana.  Even after 20 years of visiting Montana, I'm still caught off guard by it's vastness and endless beauty.  I never truly understood why people referred to Montana as Big Sky country until I saw it with my own eyes for the first time.

The large, open, mountain fields...

     The sweeping vistas...


There's a ruggedness to the land and the way people lived.  Before "tiny home" became a buzzword, a smaller homestead was a reality born of necessity.

But in the end, what draws me back to Montana is Yellowstone National Park.  It has an illusion of simplicity, but in reality nothing is simple in Yellowstone.  it's a complex ecosystem that pushes and pulls to find its balance.

It's this balance that I envy as it serves as a reminder that my own creativity can only thrive when family, friends, and work are in balance


This is just a little series to show why John likes black and white photography.  Pro-photographer John Batdorff is a respected black and white photographer. Join him to improve your black and white processing skills in Adobe's Lightroom and Silver Efex Pro 2. Starting at conversion and ending with a dynamic black and white photo, John will guide you step-by-step through his processing workflow for black and white images. He'll cover landscapes, street shots, and fine-art images to help you take your grayscale photos to the next level. You will learn how color impacts your black and whites, unique compositional tools for intentional black and white photography, how to use harsh light and shadows to your advantage, and when to choose black and white. Techniques will include using color sliders to selectively adjust tonal ranges, creating dynamic light with the use of radial filters and Nik Control Points, and advanced Tone Curve techniques for improved contrast control. He will also show you how to make your own presets once you've mastered your black and white technique. This will be an in-depth exploration of black and white photography with live, step-by-step processing examples and you'll walk away viewing black and white photography in a new light.

John Batdoff is an award-winning travel and street photographer based in Chicago. He is the author of "Black and White: From Snapshots to Great Shots," "Plug In with Nik: A Photographer’s Guide to Creating Dynamic Images with Nik Software," "Nikon D7100: From Snapshots to Great Shots," and "Street and Travel Photography: From Snapshots to Great Shots," as well as his Learn by Video DVD "Master Lightroom Presets: Enhance Your Creativity and and Increase Efficiency." John leads destination workshops from New York City to Death Valley and more and he mentors other aspiring photographers in his Chicago studio. See his work and read his popular photography blog at johnbatdorff.com.  John Batdorff - Chicago Photographer, Author, Instructor

John will be teaching at CAPS-Chicago Area Photographic School on Saturday, November 21st.
To visit the CAPS website go to: Home
To register for CAPS go to:  Chicago Area Photographic School (CAPS) 2015 - RegOnline

Sunday, October 11, 2015

"Quick Tips to Photograph the Stars" by Jennifer Wu


Yosemite National Park is just a few hours away from me and I love photographing there both by day and at night.  I especially enjoy shooting at night because people go to sleep and I feel as if I have the park all to myself.  I photographed the image above in Yosemite during the summer of 2010 at f/1.4, 20 seconds, ISO 1600 with a 24 mm lens on the Canon EOS 5D Mark II.  Photographing the stars as points of light without star trails can really create a beautiful image.  our eyes see the Milky Way as a band of light in the sky and the camera picks up the colorful gases and more stars making the sky even more incredible.  The digital camera allows for stars to be photographed at very high ISO with lower noise than with film cameras.  Here are a few of my tips for photographing the stars:

What Lens to Use?
First, use a wide angle lens, such as 14-35 mm actual focal length.  This will allow for less movement of the stars and keep them more as points of light.  The longer the focal length of the lens, the faster the shutter needs to be to stop the action and have the stars as points of light.

What Aperture is Best?
This will vary depending on how much light is in the sky.  Fir a dark night, try a wide-open aperture to get as much light into the camera as possible such as f/2.8 or f/1.4.  If you have moonlight, then you can set your aperture to f/4 or higher.  

What ISO Setting?
If is important to set the ISO high enough to get a good exposure because you don't want to have to lighten the images in post processing which will increase the digital noise.  I put the camera in manual metering mode and set the exposure so that it is on the plus side by one or two stops.  For a very dark night without the moon, try using an ISO of 3200 or 6400 to get you in the ballpark for the exposure.

Where to Focus?
Be sure to focus on the stars.  The easiest way is auto focus on a distant object during the day and tape the lens or focus on the moon at night.  Be sure to turn off the auto focus so it doesn't change while you are shooting.  Using live view is another way.
There is something very special about photographing at night with the beauty of the stars overhead.  For me, it is both calming and peaceful.  I hope by following my "quick tips to photograph the stars" you are able to take some amazing photographs.

Go Shoot the Stars!


I used a fisheye lens to get more of the Milky Way in the image because it has a wide-angle of view.  The night was colorful with some greens and hints of purple colors in the sky.  I could not see the color with my eyes, but the camera could pick them up.  The yellow on the horizon line is light pollution, but I like how it adds a nice color to the image.  Photographed at Bryce Canyon National Park at f/2.8, 25 seconds, ISO 6400, 15 mm fisheye lens, Canon 5D Mark II


During the day I scouted for a location to return to at night.  I was photographing with my friend Chris and when we returned at night, he no loner wanted to shoot!  I walked out into the river to a rock bed to get a close foreground element of the moving water.  Chris said to me, "If you fall in the river, be sure to hold up the camera and I will save it."  I guess he has his priorities!  I didn't include much of the sky because there was so much ambient light from the moon.  Photographed at Zion National Park at f/2.8, 30 seconds, ISO 1600, 16-35 mm lens at 16 mm, Canon 1Ds Mark III.


Look for foreground elements such as rocks, mountain silhouettes or trees.  The bristlecone pine tree is silhouetted against the stars with the Milky Way placed off center to balance the two elements in the scene.  this image was photographed in the White Mountains, California at f/1.4, 20 seconds, ISO 2000, Canon 5D Mark II.

Jennifer Wu, a professional photographer since 1992, is best known for her nature, landscape and night photography.  Jennifer was named by Canon USA to the elite group of photographers, The Explorers of Light.  Jennifer has published a book with James Martin, "Photography, Night Sky" which is a field guide for shooting after dark.


Jennifer will be speaking at CAPS-Chicago Area Photographic School on Sunday, November 22nd. She will be talking about photographing from dusk to dawn.

To see the CAPS webpage go to:  Home


Saturday, October 3, 2015

"Composing Images of the Natural World" by Steve Gettle

Steve's photography has taken him throughout North and South America from the woods of northern Canada to the Cloud forest of Ecuador, from the coast of Maine to the high plateau of the desert southwest.  although he travels extensively, he finds much of his inspiration in the natural areas surrounding his home in Brighton, Michigan.  Steve leads photo workshops and tours all over the world.  As an instructor he has taught for such organizations as:  The North American nature Photography Association, The Rocky Mountain School of Photography, The Adirondack Photography Institute and many more.  He is a great nature photographer and will be teaching a half day class on both Saturday and Sunday, November 21st and 22nds at CAPS- Chicago Area Photographic School. Steve is being sponsored by Hunt's Photo and Video at CAPS.

Saturday- "Photographing Birds and Mammals"
This course will cover how and where to photograph the birds and mammals of our planet. Attendees will not only learn where to find their subjects but also how to use blinds, calls, baits and other advanced techniques to attract wildlife. We will also talk about special compositional guidelines for these types of subjects, and fine tuning your autofocus to capture action and flight shots.

and  "Macro Photography"
Participants will learn how to use basic equipment to make beautiful images of things in the realm of the small, from the size of a butterfly to as small as a tiny snow crystal. We will not only cover the equipment needed for this type of photography but also the specialized techniques used in this challenging genre of nature photography. We will discuss such things as, maximizing depth of field, controlling light, controlling the background, using flash, and much more.

Sunday-  "Composing Images of the Natural World"
The main emphasize of this two part program will be composition. We will focus on the many elements that make up the composition of a beautiful image, using hundreds of examples and practical, real world situations. We will learn the “rules” of composition as well as when and why to break them. Attendees will learn how to find the picture, and how to work a subject to maximize the potential of every situation. In addition, we will cover how to control such things. as lighting, backgrounds, depth of field, and perspective to enhance the composition. The second part of this program will talk about how to more effectively communicate your vision and more importantly, your message with your photography.

Wilderness Images
The Nature Photography of Steve Gettle
8877 River Valley Ct.
Brighton, MI 48116
Studio 810-231-8118
Fax 810-231-8119

To visit the CAPS website go to: Home
To register for CAPS go to:  Chicago Area Photographic School (CAPS) 2015 - RegOnline

Friday, September 25, 2015

Modern Techniques for Classical Printing with Emphasis on Luminosity Masks by Dan Anderson


Over the last few years there has been a constant evolution in the techniques available to photographers to use and wherever these new tools and techniques can be employed for increasing my own personal expression in my prints, I welcome and adopt them.

I will be showing several of these techniques that I now use including the use of luminosity masks and a layering technique to make images that I call timescapes.


I will also introduce a brand new method of making black and white images that doesn’t use any current method of conversion to black and white but rather exclusively uses luminosity masks as art objects themselves.

Daniel Anderson is a photographer whose ongoing personal work is primarily dedicated to the landscape in its many forms. For years he concentrated on the 8 x 10 view camera and techniques and methods perfected over years of hand processing and printing to create black and white images of exquisite artistry and sensitivity. Over the last decade, he has transitioned to a high end digital approach to image capture and printing resulting in increased control over the photographic process. 

He has photographed widely throughout the American West, Greece, Iceland, Italy, England, Scotland, Ireland and Antarctica. His work is primarily concerned with the natural scene and his camera has captured both the high drama of storms and vast panoramas as well as the delicacy of the intimate detail of the American Landscape. His work also includes a series of images of European Cathedrals and Abbeys and a series of Wisconsin barn interiors.

His work has been widely exhibited throughout the United States and Europe in numerous one-man exhibits and group shows. His work is included in many public and private collections. He currently has gallery representation in Ellison Bay and Sturgeon Bay, Wisconsin. He has written articles for Photo Techniques Magazine and other publications. 

Dan has studied with Ansel Adams and other contemporary masters of photography.
He has been an active teacher in photography, participating in many workshops throughout the United States. As founder of Wisconsin’s Door County Creative Photography Workshops, Dan has offered darkroom printing and other workshops to hundreds of students since 1984. In 2004, he began offering workshops in fine art digital printing.  He is also on the faculty of Door County’s Peninsula Art School and has served as a consultant and product beta-tester for several photographic paper companies.

Webpage:  Daniel Anderson Photography - Home page
Facebook:  Daniel Anderson Photography

Dan will be presenting at CAPS- Chicago Area Photographic School on Saturday and Sunday, November 21st and 22nd.  For the CAPS website go to:  Home

To register for CAPS go to: Chicago Area Photographic School (CAPS) 2015 - RegOnline 


Friday, September 18, 2015

How to Plan Your Own Do-It-Yourself Photo Safari by Matt Sparapani and Alison Newberry


Do you ever look at an advertisement for one of those fabulous photo safaris in Africa and think, “That sounds incredible, but I can’t afford that” or “Someday I will do that, but that’s a once-in-a-lifetime trip”? Our philosophy is carpe diem: seize the opportunity and go now. How you ask? By planning your own do-it-yourself photo safari.


As teachers, the three things we love best are June, July and August. Summer is the time of year we get to travel, hike and photograph nature, so we do our best to take advantage of our time off. Many people we talk to say they would love to travel more but feel they can’t afford it. Our answer to that is “Do It Yourself!” With a little bit of research and advanced planning, you can build your own independent photo adventure. You’ll lose the crowds and escape the pre-set schedule of an organized tour. Plan an itinerary that suits your interests and gain the freedom to shoot as many zebra pictures as you want! Why pay someone else to guide you when you can do it yourself more affordably?


Our program will take you through our process of planning great photography trips, from researching potential destinations to booking transportation and locating local outfitters. We will tell you about self-driving safaris in South Africa, Namibia and Iceland, supported trekking adventures in the mountains of India and Peru, as well as some fantastic drivable destinations right here in the US. 


Topics Covered in Program:
  • Thought process involved in planning a do-it-yourself photo safari
  • Timeline and resources available
  • Important considerations:  budget, time, permits, visas, physicl limitations, desired activities, prime times of yer to visit, etc.
  • Lodging, food and transportation options
  • Challenges and rewards of do-it-yourself travel
  • Creative ways to document your adventure

Bio: About Matt & Alison

Matt and Alison discovered their passion for travel (and each other!) while living in Italy nearly 20 years ago.  As newlyweds they discovered a mutual love of nature photography at an Audubon Society workshop in Main.  since then, they have combined travel and photography with a variety of outdoor activities.  From trekking in Nepal to safari in Africa, from backpacking in Patagonia to canoeing in the Boundary Waters, the camera has served as a constant reminder to pause and savor the subtle beauty of nature.  As one of their favorite bands sings, "You get to know things better when they go by slow!"

While not on the road, Matt and Alison reside in Chicago.  Matt teaches Latin, Greek and Ancient History at a private high school, while Alison teaches computer at a K-8 public school.  They have been active members of Riverwoods Nature Photographic Society for the past 10 years which they credit for helping them hone their skills.  You can see Matt and Alison's photography and follow their adventures on their blog, Take a Hike Photography (www.takeahikephotography.wordpress.com) Matt and Alison are also contributors to Sidewalk, a new curated online hiking magazine that helps readers discover and plan amazing hiking adventures (www.visitsidewalk.com).

Matt and Alison will be speaking at CAPS- Chicago Area Photographic School on Sunday, November 22nd.
Check out the CAPS homepage at: Home
To Register for CAPS go to: Chicago Area Photographic School (CAPS) 2015 - RegOnline


Friday, September 11, 2015

Optimizing Images for Presentation by Bob Benson


We all have this same problem when evaluating our images: 

We can easily judge others works for flaws (perhaps too readily sometimes), but are blind to our own transgressions. How many times do you find yourself looking at a recent image, and jumping into it, eager to make software improvements before printing or sending it off to the web? Perhaps you remember the magic of the moment of the shutter click, or you are over whelmed by the beauty or uniqueness of the image in front of you. But did you see those little (and sometimes big) improvements or corrections that should be made first?

At my CAPS class, I will talk about the approach I try to use to prevent the above scenario. (It is hard to break habits, and like most people, sometimes fail at my own advice.) I am not talking about understanding the camera functions, or good composition; these are learned processes that are needed to start the digital process not covered here. I plan on discussing not only the approach to breaking the cycle of evaluating the finished results, but by process of examples, show some software techniques to improve the images that have worked for me in the past. No one person’s process flow covers the best for everyone by any means, but hopefully by showing these examples you can get revved up to the next level with your images, or find some technique that helps your process flow.


Below is an example of a before and after that I will show the steps I used to make the final image.


Bob Benson, APSA, is active in CACCA as a current board member and former president. He co-founded the first all digital camera club in the area thirteen years ago. He is also active in PSA as the chair of the international Inter-club Competition for Pictorial Image Division, and writes a regular column for the Journal on Lightroom.  He has received the Charles Stinson and Wanda Christl awards for his local contributions to photography. He started with version 3.0 of Photoshop, and he is still learning all its intricacies.


CAPS-Chicago Area Photographic School will be on November 21st and 22nd at Elgin Community College.  Check out the Caps homepage at:  Home