Sunday, October 22, 2017

"Creating Stunning Reflections" by Steve Gettle

As a photographer I find reflections to be a fun and artistic tool, offering many creative possibilities. For this reason, I am always excited when the opportunity arises for me to include them in my compositions. From the viewers perspective, reflections add interest to images by challenging their visual perception.

Being a nature photographer, the reflective surface appearing most often in my images is water. When water is perfectly still it takes on a magical mirror like quality that is very beautiful. In situations like this I often like to create images that celebrate the symmetry between the main subject and its reflection, as in this image of a Blacksmith Plover from Africa.

When creating images like this I make every effort to keep the image clean and simple, working hard to eliminate anything in the composition that will detract from the symmetry.

This next image is from a canyon in Utah. It celebrates another type of reflection I like to play with, which I call a “light reflection”. For this composition, I have included a shaded section of stream. Reflected in the water of this stream is a red rock wall that is fully lit by the rising sun, creating a beautiful stream of molten gold. Surprisingly I often use a polarizer when creating images like this. Which seems counter-intuitive because polarizers are often used to remove reflections but in this instance I will use the polarizer to intensify the colors. I look through my camera as I rotate the polarizer until I get the effect I like.


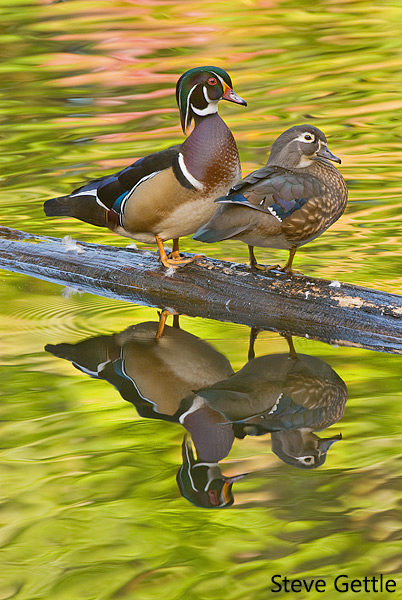
For this image of a Wood Duck pair created in Ohio I have combined both principals. In addition to the duck’s reflection we also have a reflection of sunlit foliage reflected in the water around them which adds a serious “punch” of color to the background. To maximize this effect, it is important that the sunlit reflection be reflected in a shaded part of the water.


When creating images of reflections changing your perspective either higher or lower will often have a big impact on the quality and position of the reflection in your final image. So find the elevation which creates the best reflection and composition then make your image. Also on a technical note, when I am making images like this I tend to stop the lens down a bit more ensuring I can keep both the main subject and the reflection itself sharp.


Good Luck and Good Light!

Steve


Over the course of his 30-year career, Steve Gettle has spent countless hours creating hundreds of thousands of photographs capturing nature’s beauty around us. Steve’s images communicate his love for the wildlife and the wild places of our world. He has had his images shown in many exhibitions and publication.  Steve especially enjoys sharing his knowledge through both private and group location-based experiences focused on individual nature photography development in once-in-a-lifetime locations.

Wilderness Images
The Nature Photography of Steve Gettle
8877 River Valley Ct.
Brighton, MI 48116
Office 810-231-8118
Fax 810-231-8119
Facebook: http://www.facebook.com/steve.gettle

Steve will be teaching "Frozen Moments: High Speed Nature Photography" on Saturday, November 19th.
Steve's program is sponsored by Cognisys - Capture the Hidden World
To see the entire schedule of  CAPS-Chicago Area Photography School classes go to: caps.caccaweb.com or click here:  Home

To register go to:  Chicago Area Photographic School (CAPS) 2017 | Summary | powered by RegOnline

Saturday, October 14, 2017

"Targeted Adjustments for Creative Results" by Bob Marin

There are several excellent image-editing programs that can be used to produce great images.  When I want to go beyond the usual image editing, I want the more powerful features of Photoshop.  For this article, I will describe my workflow - how I use Camera RAW and Photoshop CC to edit images.

Since I shoot exclusively in RAW format, my workflow starts in Camera Raw where I click one of my saved presets that I have created.  These establish the starting values for the following:  White Balance (As Shot), Clarity, Vibrance, Saturation, Point Curve, Sharpening, Noise Reduction, Lens Profile, and Dehaze.  Then I evaluate the image to see if the chosen preset gives me a good starting point.  Next, it  is the time for critical adjustment of White Balance and tonal balance - Whites, Blacks, Highlights and Shadows adjustments in that order.  I usually leave the Exposure and Contrast slides at zero.  I am disciplined to use the right meter mode and compensation when needed so I rarely need an Exposure adjustment and I prefer to leave Contrast adjustment for a later Curves adjustment.  Once I am satisfied with these basic adjustments, I move on to more exact adjustments of elements within the image.  For these edits, I’ll use Photoshop.

One of the most valued Photoshop features is the ability to use layers.  This yields a non-destructive workflow that can be altered at any time without any destructive effect on the original image.  A layer can be the original image (the actual image pixels), a duplicate of the image, a different image, a “Fill” or “Gradient” layer, or an “Adjustment” layer.  Each layer can also have a layer mask – some are added as soon as the layer is created or you can add a mask later.  Layer masks allow one to make minor or very sophisticated and targeted adjustments.  A layer mask can also be used to block image ingredients that are not wanted.

This is a good time to mention some restrictions.  If you are preparing an image for a Creative competition, you can charge on – there are few restrictions.  Just make sure that all the image ingredients are your original captures.  Most applies equally to a Pictorial competition with, perhaps, holding back on wild extremes (for example use of unnatural or abnormal colors).  If you are considering submitting your image into a Nature competition, the story is quite different.  Only very basic adjustments to a nature image are allowed.  Know where your image is headed and know the rules.

To demonstrate a layer mask, let’s use this image of a tiger.
We can add a “Black & White” adjustment layer to extract the color and convert to a monochrome image.  This also automatically adds a “Reveal All” layer mask.  The mask is filled with white.  When working with masks the saying is: “White Reveals and Black Blocks”.  To demonstrate, let’s turn our tiger into part white tiger and part normal tiger – think of it as a tiger with a split personality.  By painting with a black brush ON THE MASK, we restrict the adjustment layer to only those areas where the mask is still white.


Here is an image of the layer mask and the effect it has on the image.


Looking at the mask, you can see some important attributes.  The white area allows the adjustment layer to be active while the black areas restrict or blocks the adjustment and the image remains in full color.  Note the fuzzy edges where the use of a soft brush allows a more subtle transition.  Also note the circle of black that allows the natural eye color to show.  The same is true for the tiger’s mouth.

Here is another example (and its layer mask) where the background layer (the actual image) has been made an active layer by double clicking on the image layer in the layer window.  This allows you to add a new background layer below the image layer.  In this example, I filled the new bottom layer with a subtle dark green color. Next, I added a “Reveal All” layer mask to the image layer.  Now when you paint with a black brush on the mask you will block (or rather, eliminate) the distracting elements in the background and leave a cleaner image with higher impact.


You can also use this approach in another way.  For example, let’s sharpen the butterfly but nothing else.  Start by duplicating the image layer and then apply the desired degree of sharpening to the new duplicate image.  Now apply a layer mask to the sharpened layer.  If you use a “Reveal All” layer mask, paint everything black except the butterfly, or use a “Hide All” layer mask and only paint the butterfly using a white brush.  Here is an image of the “Hide All” layer mask that was used above to reveal the sharpen butterfly.


Once you have created a working layer mask, you also have a selection.  Just right click the layer mask and choose the option “Add mask to the selection”.  If there was no selection active before you took this step, you will now have an active selection of the image that is ‘revealed” by the white area of the mask.  Since you needed the layer mask to creative the desired changes to your image you can appreciate the fact that the selection comes virtually free.  And, you do not have to save the selection for as long as you retain the mask, access to the selection is still there.  Now the question becomes “What can I do with it?”

We have been using layer masks to achieve targeted adjustments.  You can also use a layer mask to add an additional image element to another image, or you can use the selection to copy an image element to paste it into a different image.  These are just different ways to achieve the same result.  In some cases one or the other method will be best – it depends on what creative result you are trying to achieve.  Also, there will be times when a more accurate, tighter selection may be required.  We’ll end this discussion with a final example of where you can go from here…

Bob Marin started his photographic hobby at an early age right after earning a few dollars and visiting a pawn shop that had an Argus C3 in the window.  Serving the government led him to Germany (land of Leica) and the hobby got a lot more serious. Earlier years, as well as now, were spent mainly on strict Nature photography.  However, creative allows one to strike a balance.  Bob had early influences through CACCA and a friend, a Lithographer, who introduced him to Kodalith, Diazachrome and 3M Color Key ... the magic began.   This may all sound foreign in today's digital age, but Bob has dug into the depths of Photoshop, and the Creative Life got easier!!! No more toxic and smelly chemicals. 


Bob Marin will be teaching "Techniques for Creative Images" on Sunday, November 19th.

To see the entire schedule of classes go to: caps.caccaweb.com or click here:  Home


To register go to:   Chicago Area Photographic School (CAPS) 2017 | Summary | powered by RegOnline

Saturday, October 7, 2017

"Understanding Your Camera's Light Meter" by Keith French

Once considered a fundamental skill in photography, reading and interpreting your camera’s light meter has nearly become a lost tool in the world of digital photography.
Today’s digital camera’s, whether in the form of a phone or an actual stand alone camera have some pretty sophisticated light reading abilities. Especially when compared to what professional photographers had at their disposal just a short 15 years ago.  With the increase in light sensitive materials and other physical components used to transfer the information of reading light to a digital or electronic signal, came the much more sophisticated algorithms for interpreting that information and creating a solution in the form of great dynamic exposure (a perfect balance between the light and dark portions of the image based on all the settings chosen by the photographer)

My experience as a camera store owner while teaching budding photographers how to improve their skills was that the light meter was the last thing many of these “students” of photography wanted to learn about. I cannot be sure exactly but I think because when they shot on AUTO, they only needed to worry about catching the moment, and composing it in the view finder and the camera took over making many decisions for them.  And rightly so, the decision process going into making a great image is layered in a thought process of “Yes – No – Do This”  check lists that eventually become nearly automated in our own brain as we grow in our skill.  While developing this skill many photographers heavily rely on the automated shooting modes like AUTO or PROGRAM of their camera.  Some never grow past this, others eventually realize as they advance in their learning and gain a more developed eye for details that they need to have more input into the thought process of creating that image.

That is the artist I’m reaching out to.  This learning process has somehow been reversed. The light meter, and it’s very close relative the histogram, are the only components of the camera that are actively communicating back to you. The operator of a very complicated and highly capable devise, otherwise known as a camera. To further appreciate that description pick up a Kodak Brownie at a garage sale and disassemble it. You’ll see it’s not much more than a small “shoe box” of a device still capable of creating world class art in the hands of an individual who has learned to read and capture light. That device didn’t have a light meter. So the individual had to spend hours, if not years mastering light. Today you have an open book test in front of you every time you set up an image. The answers are all right in front of you, all you have to do is interpret the data and make a few decisions. Mastering the light meter will save you hours in post processing, teach you how to better read light, and give you the control you’ll enjoy having when setting up and creating that perfect image in a highly dynamic lighting situation.

So where is the light meter in your camera?  Chances are you have looked at it numerous times and looked right past it. It’s usually in the bottom of your viewfinder or screen in live view and it looks similar to this:

I have added the red arrows and the text so you know what it is telling you, but there it is.

You also need to under stand the 4 modes you have available as far as light meter settings go. In other words, where is the meter measuring the light? 

Here are 4 examples of relative measuring:


The area in blue is where the camera is “looking” when it reads the light and provides you feedback via the light meter.


Having the right setting and following it’s advise takes you from this:


 to this:
 Now I’ve been on social media, and I’ve seen plenty of images where the general public lauds praise on the former image, but you don’t need to have too discerning of an eye to see the difference.  It’s was an easy setting change from one metering mode, in this case Evaluative, to Partial.  Of course knowing to make this setting change ahead of time saved a lot of post processing corrections.

So much money has been invested in research and development by the manufactures of your devises you use to make images that you may want to consider understanding why, especially if you are looking to take your skill and presentations to the next level. Eventually a few quick decisions, and setting adjustments as you approach a scene or activity and you are on your way. It doesn’t have to be hard and the manufactures went out of their way to make it as simple as they can so you use it.  Unfortunately the process in which many have learned photography bypassed this tool altogether. 

At CAPS we are going to unpack the light meter modes, explain it, show samples, and explore the light meter in your devise. Getting the proper exposure to this old film shooter means getting it right in the camera, so I can spend more time shooting and less time post processing.  

Keith French has been a full time professional photographer since 2001 with an extensive background in several types of photography dating back to 1984.  His years as an owner of a full service retail camera store, Photo/Video studio, and commercial color and B & W photo lab, gave him a unique look into the full circle of the photographic industry. Buying and selling equipment and accessories, hosting and teaching photography classes and workshops, shooting and printing, combined with his time as a United States Marine Corps Aviator and the travels that were associated there. Keith has a well-rounded repertoire of photographic experience on 4 continents and 3 oceans.

Keith currently runs workshops with Tony Reynes and Out of Chicago


Workshops:  http://kfrenchphoto.com/photo-workshop/  Hands On Photographic Workshop

Keith French will be teaching "Get the Right Exposure, Understanding Your Camera's Meter" at CAPS-Chicago Area Photographic School on Saturday, November 18th.

To see the entire schedule of classes go to: caps.caccaweb.com or click here:  Home

To register go to:   Chicago Area Photographic School (CAPS) 2017 | Summary | powered by RegOnline